Sunday, August 28, 2011

My daughter's baptism

She's got to wear it!
   It's my daughter's baptism day and I'm so happy she was able to wear the shoes I made. You know when you're a mom, well a mom like me, would love to  do something like this to be remembered. I love to remember how beautiful and cute she is and will always be in my heart.
She is amazing. It is seldom that she wouldn't cry everytime a stranger come near or touch her. But today she is so calm and like she knows everything that is happening around. I'm so proud of her and will always be.


Friday, August 26, 2011

Making my daughter's baptism shoes - Part 2

I think I'm done but wanted to do more. So here's the finished shoes. I think it's cute, and my daughter thinks so too. She can't help pulling the flower I attached on the top. I kept telling her "No!". She's a good listener but she thinks No means " yeah baby you can do that". Ah what a mess! I had to try it on her feet again and again to see how it looks and then she keeps trying to mess it up. Anyway, this is how it looks now.


 Here's how I came up with my finished shoes:

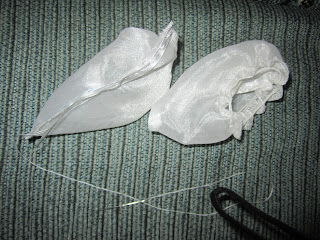
 Step 1: I cut a sleeve of a white dress which has the same fabric as her baptism dress. Make stiches on one end to close it and form a shoe like this. I think it looks more like mittens. Lol.


Step2:  I adjusted the bottom part to make it flat... and put linings to make it not see through.  I ended up with a pointed shoe. I wanted to adjust the toes part but won't fit her anymore.


Step3: Added ribbons sewed on the sides so it won't come off from her feet.

nice! :D
Ste4: Made flowers out of the remaining fabric to put on the top. Heres how I made them:

Make 7 of  these.

Stack the petals together.

Sew them together and add beads.

Make 2 flowers for the pair. I have a tutorial on how to make this flower under fabric flowers.

Step5: Sew the flowers on the top of the shoes. Gluing in an option but I wanted the flowers to be removable.


That's it! Now you wanna know how much I spent to make these shoes. Maybe 97 cents to a dollar for the ribbon and thread. Other materials did not cost me a penny.

97 cents ribbon from walmart ( still have a yard left)

an old dress with beads  i got from a yard sale
beads are everywhere on this dress.


more beads! cost me 25 cents to buy this dress. i think it's made in the Philippines cause the tag said so.

I hope you enjoyed my tutorial. See you next time.

Tuesday, August 23, 2011

Making my daughter's baptism shoes


It's the cutest thing ever! LOL I wish. If I only knew how to make everything I will. But I'm not that talented. So my husband told me to make it ahead of time so that if I don't like it... umm I still have time to make another one? No no no! I guess not. Haha. No. So we still have time to buy one just in case.

I can't find one in the store that I like. Some won't fit her anymore or they dont have bigger size. She has big feet just like her dad that wears size 13. I hope she won't wear size 13 when she grows up.

Here's my shoe making progress. I just used a sleeve from a dress.


Boring? Not too nice? Just wait when it's finished and you will say " Wonderific, you are terrific!". 


Friday, August 12, 2011

Changing the Look of Your Scrapbook Album


My scrapbook album when it was new was like this :


then after a month it was like this :


and then the paper flowers on the cover gets torn overtime, so I decided not to put paper embellishments outside the album. And then, this is how it looks now :


I think it's perfect, for now. I like that it looks vintage and simple.

Here is a quick tutorial on how to make this album.
First you need: a 12x12 scrapbook album, fabric, glue, fabric and 4x6 photo.
 I choose denim because it is the only plain fabric I have and it's hard to get torn.


Step 1: Get your fabric. Here's mine. An old clothes that I no longer use. Put it around your album and cut.


Step 2: Cover the album just like how you would cover a book.


Step 3: Get some fabric that you want to decorate and some fabric flowers too. Place it on the album however you like.

flowers, net fabric, and a printed gathered fabric.
before gluing make sure that's how you want it to look like
add some lace on the other side


Make your own picture frame from a piece of cardboard and put a slit on the side. you dont want to glue your picture on the frame in case you want to change it later.


My finished baby scrapbook album. 


Saturday, August 6, 2011

How to turn plain skirts more colorful and beautiful

I got this skirt for my daughter today and it is super cute. I thought it would be cuter by putting some embellishments. The possibilities are so broad and endless. It's totally up to you (me! lol) .  I'm confused which style should I pick. They all look pretty.  Maybe I will get more skirts like this. What you think?

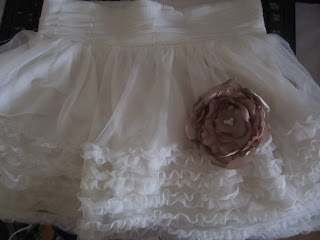
Here is the original skirt :
original white plain skirt

skirt with fabric flower in a rectangle shape

skirt with single flower on the waist

skirt embellished with a single flower around its body

skirt with flowers in a diagonal position

skirts with different color flowers above the hemline

skirt with 2 fabric flowers around the waistline

skirts with 2 fabric flowers just above the hemline


Friday, August 5, 2011

Singed Flower


These fabric flowers are made of organza fabric. If you do not know what an organza fabric is, check your clothes for some linings. It is usually what princess dress and gown made of, if not made or silk. They are absolutely cute.Click here for the tutorial on how to make these flowers.


How to make your own singed fabric flower

This post will teach your how to make your own fabric flower from scratch.
First you need:
Fabric - must be 100% polyester
candle and lighter
scissors
cardboard

Step 1:  Cut a piece of cardboard and shape it like a flower.


Steop 2: Trace the flower shape cardboard on the fabric and cut. You need to do this twelve times.


Step 3:  Burn the side of the fabric using candle. Be careful not to burn yourself.  Warning: Dont let your kids see this or they might do it too and burn the house.


It should look like these after :


Step 4:  Stack your petal together like this :  You may want to cut smaller sizes to put on the top of your flower. Saw the pieces together or may use hot glue to make them stick together.  I sew mine and put some beads or buttons in the middle.


Enjoy your flower making. If you like this post please make a comment. See you on my next tutorial!

Tuesday, August 2, 2011

New baby slippers I made


This baby slippers are made of denim fabric. The huge flowers on top are made of old t-shirts. When I made them for my daughter I didnt really meaure her feet and they came out really big for her feet.


Because they are very easy and fun to make I made another one, smaller than the one above and it fits my
baby's feet! Finally.


She likes them :D


FEEDJIT Live Traffic Feed